Nextplore
Multi-tenant microservice SaaS designed to leverage Large Language Models (LLMs) and advanced metaprogramming to enable general users or developers to interact with range of databases easily without knowing SQL language
![]()
Nextplore
AI-powered insights • Secure • Instant • Beautiful.
⚠️ Status: WIP
Nextplore is under active development. Interfaces and features may change without notice.
Nextplore - LLM-powered SQL ORM Context Creator
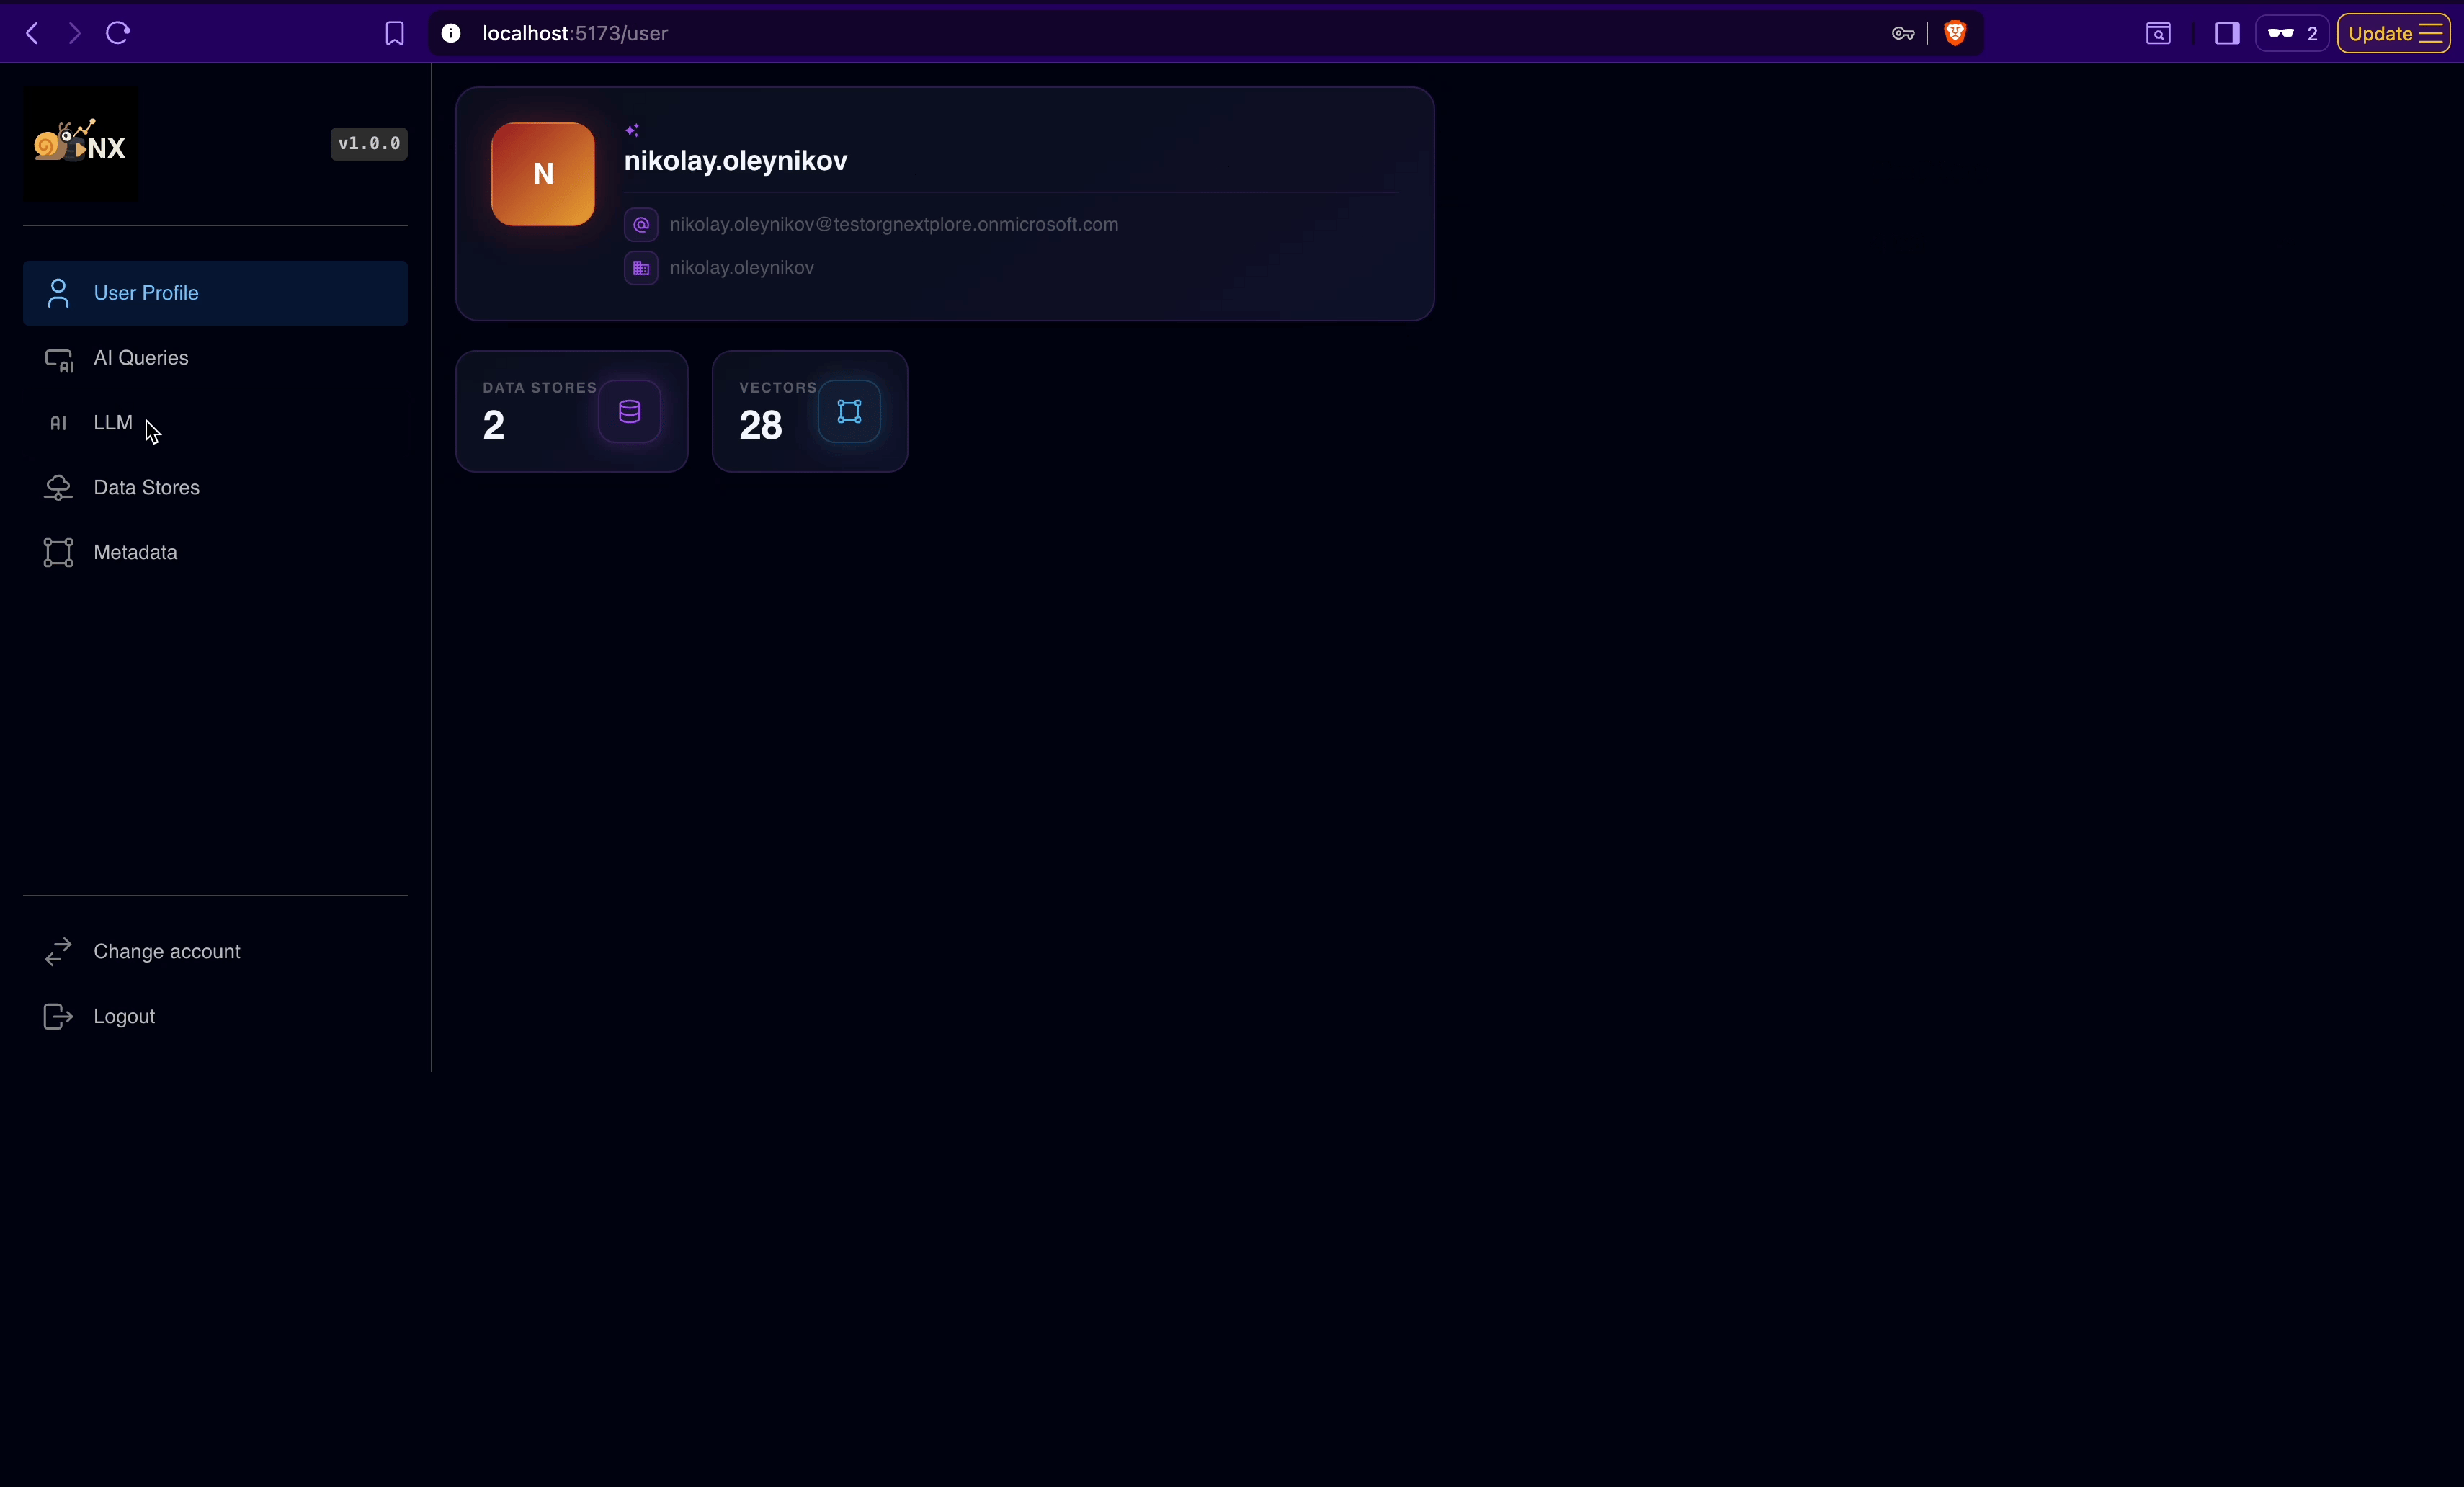
Nextplore is a multi-tenant SaaS platform built on a microservice architecture, enabling natural language querying across enterprise databases without requiring SQL knowledge. It leverages LLMs combined with a retrieval-augmented generation (RAG) pipeline - including vector-embedded schema metadata, multi-query expansion, and semantic routing - to translate user intent into context-aware database queries. Nextplore supports PostgreSQL, MySQL, SQL Server, and Snowflake, with native cloud IAM authentication across AWS, GCP, and Azure - including IAM roles, service account credentials, Azure AD (Entra ID), and certificate-based auth. Data stores can be registered from any cloud environment, enabling cross-cloud querying from a single interface. On the model layer, Nextplore integrates with 2,600+ language models across 140+ providers through a unified OpenAI-compatible abstraction - including OpenAI GPT-4o, Anthropic Claude, Google Gemini, Meta LLaMA, DeepSeek, Qwen, Mistral, and more. Users can bring their own API keys, connect self-hosted models via Ollama or vLLM, or register any OpenAI-compatible endpoint. All credentials are protected with envelope encryption (AES-256-GCM + RSA-OAEP) via Azure Key Vault.


![]()

Table Of Contents
- What it Does
- Architecture
- Tech Stack
- Database Support
- Llm Integration
- Security Model
- Observability
- Demo
- Integrating Data Stores
- Links
- Roadmap
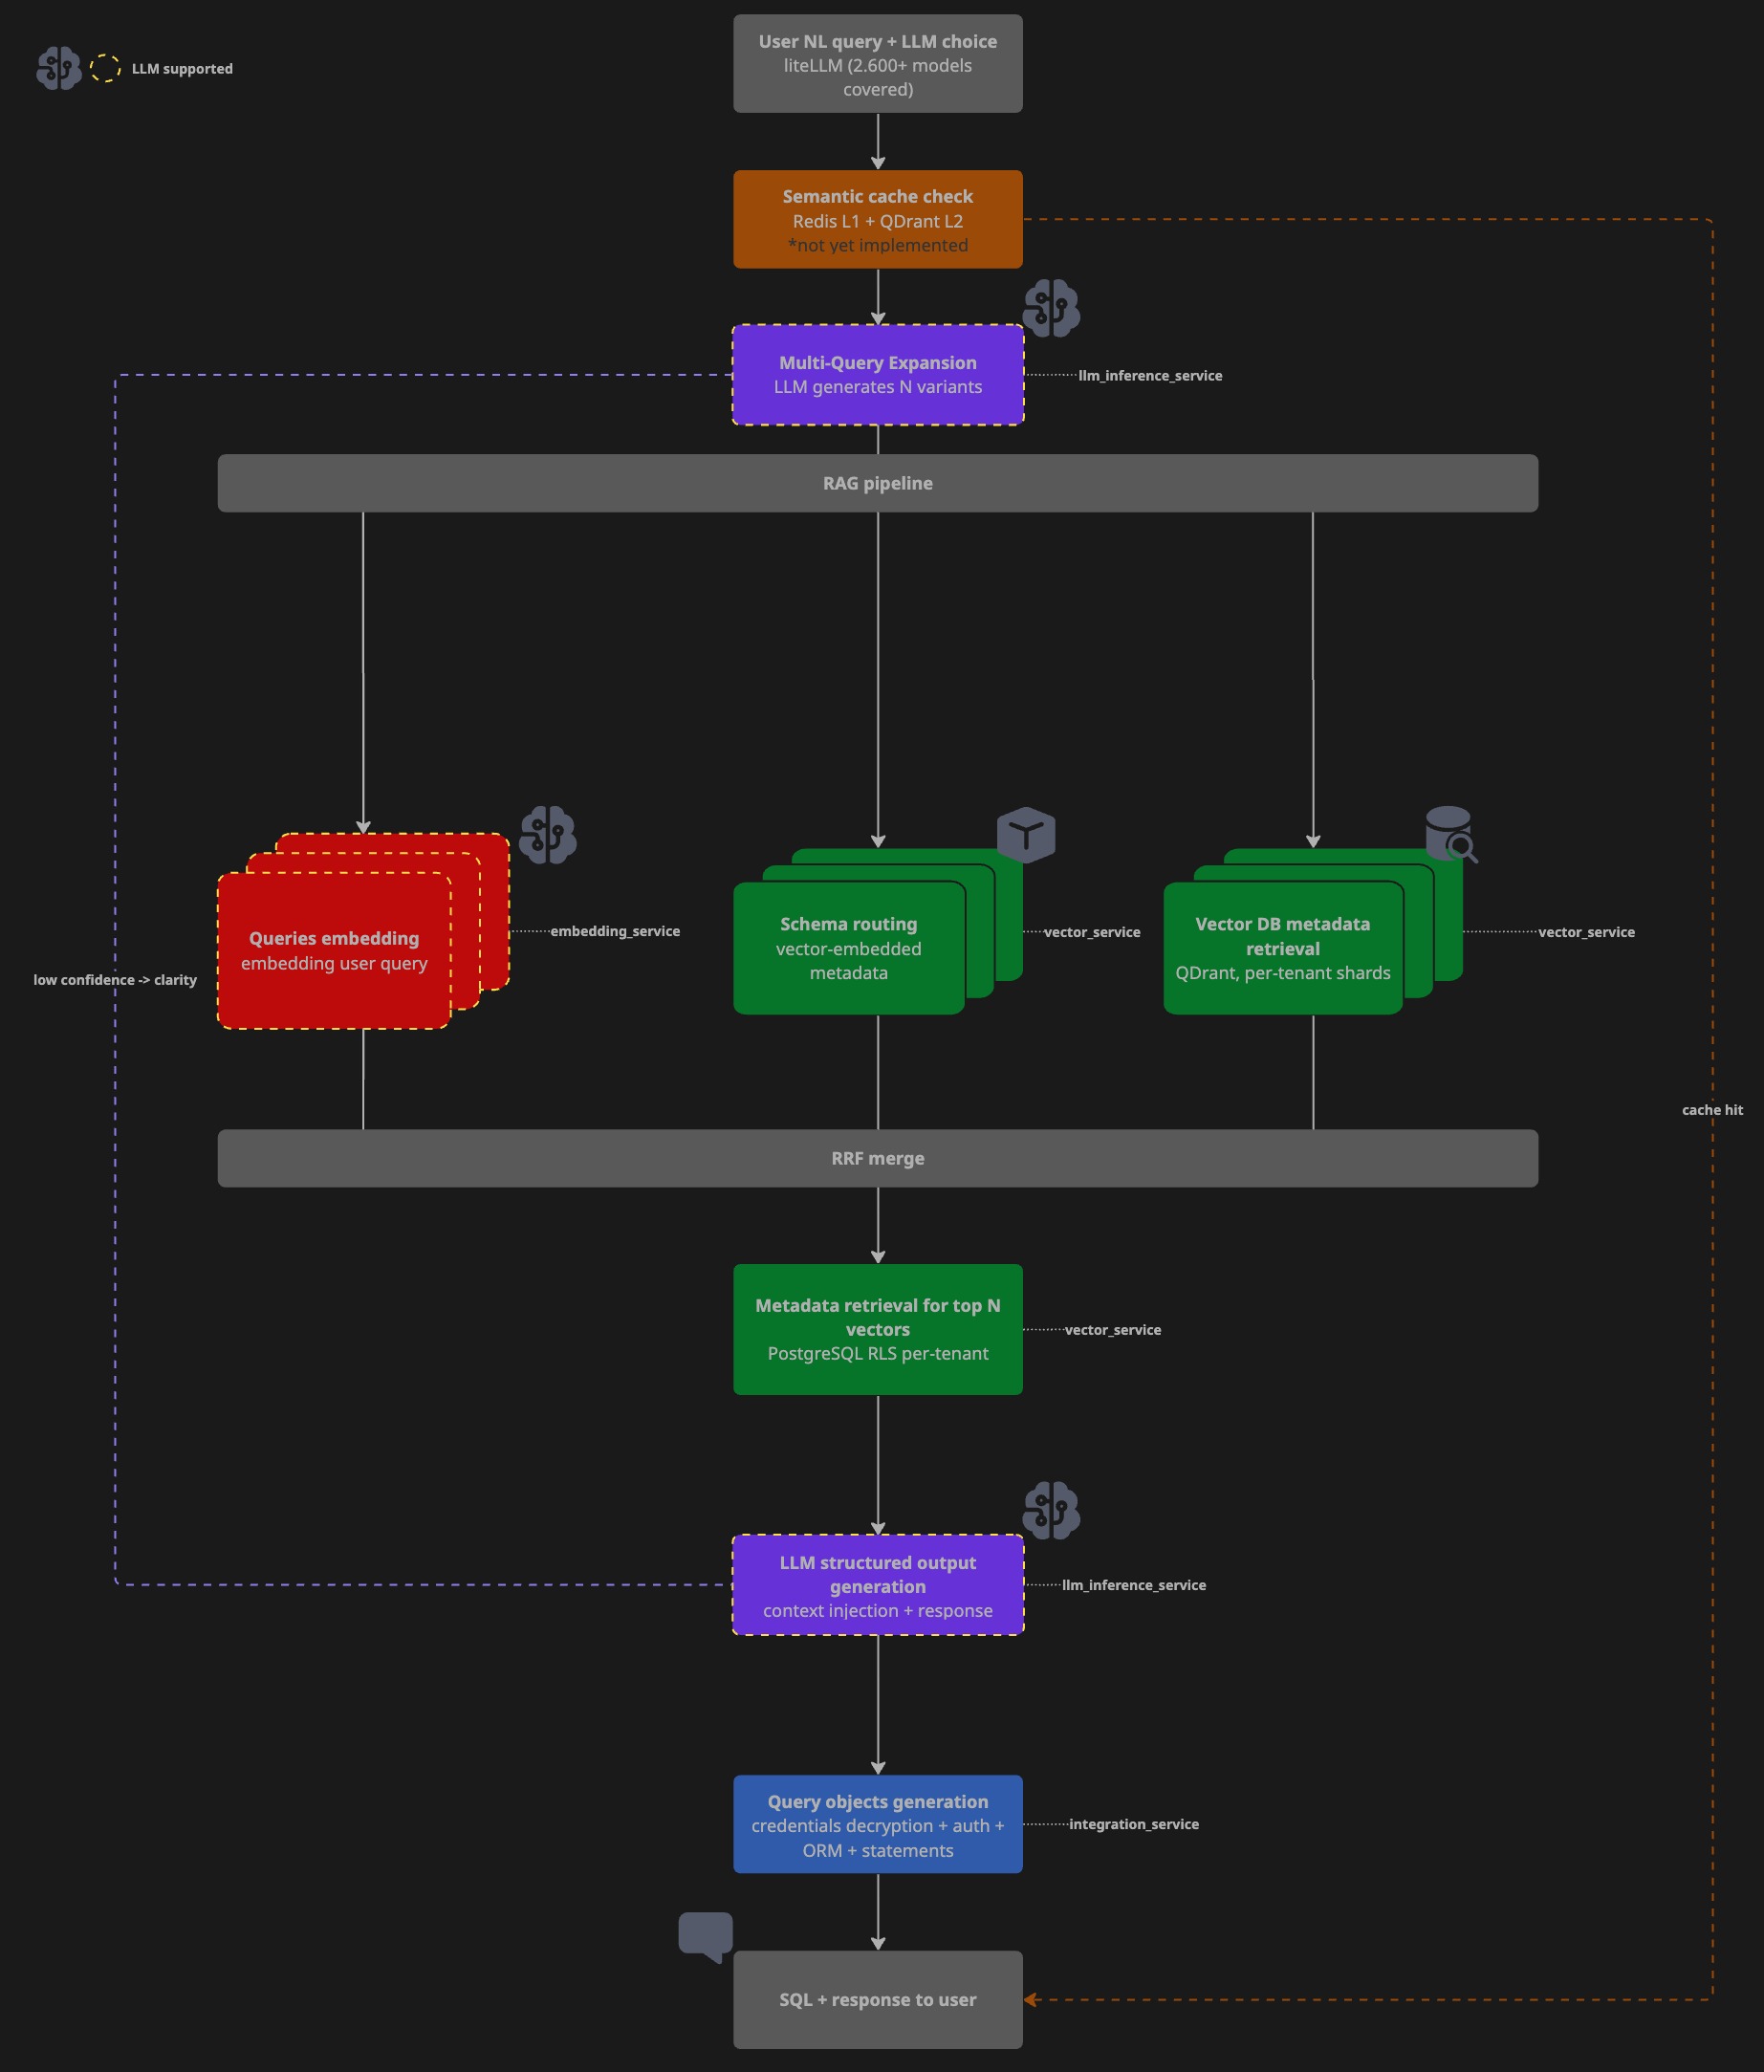
What It Does
Under the hood it runs a multi-stage RAG pipeline:
- Schema ingestion - crawls connected databases, embeds table/column metadata with contextual descriptions, stores vectors in Qdrant with tenant-scoped payload indexes
- Query expansion - decomposes the user prompt into N semantic variants via LLM (multi-query retrieval)
- Vector retrieval - cosine similarity search over embedded schema metadata, re-ranked with Reciprocal Rank Fusion (RRF)
- ORM context generation - LLM maps retrieved schema context to a structured JSON response (
datastore,schema,table,columns,filters,aggregates) - Dynamic ORM execution - SQLAlchemy metafactory instantiates a typed ORM model at runtime from the structured context and executes the query read-only
All operations are strictly read-only on source systems.
Architecture
Components
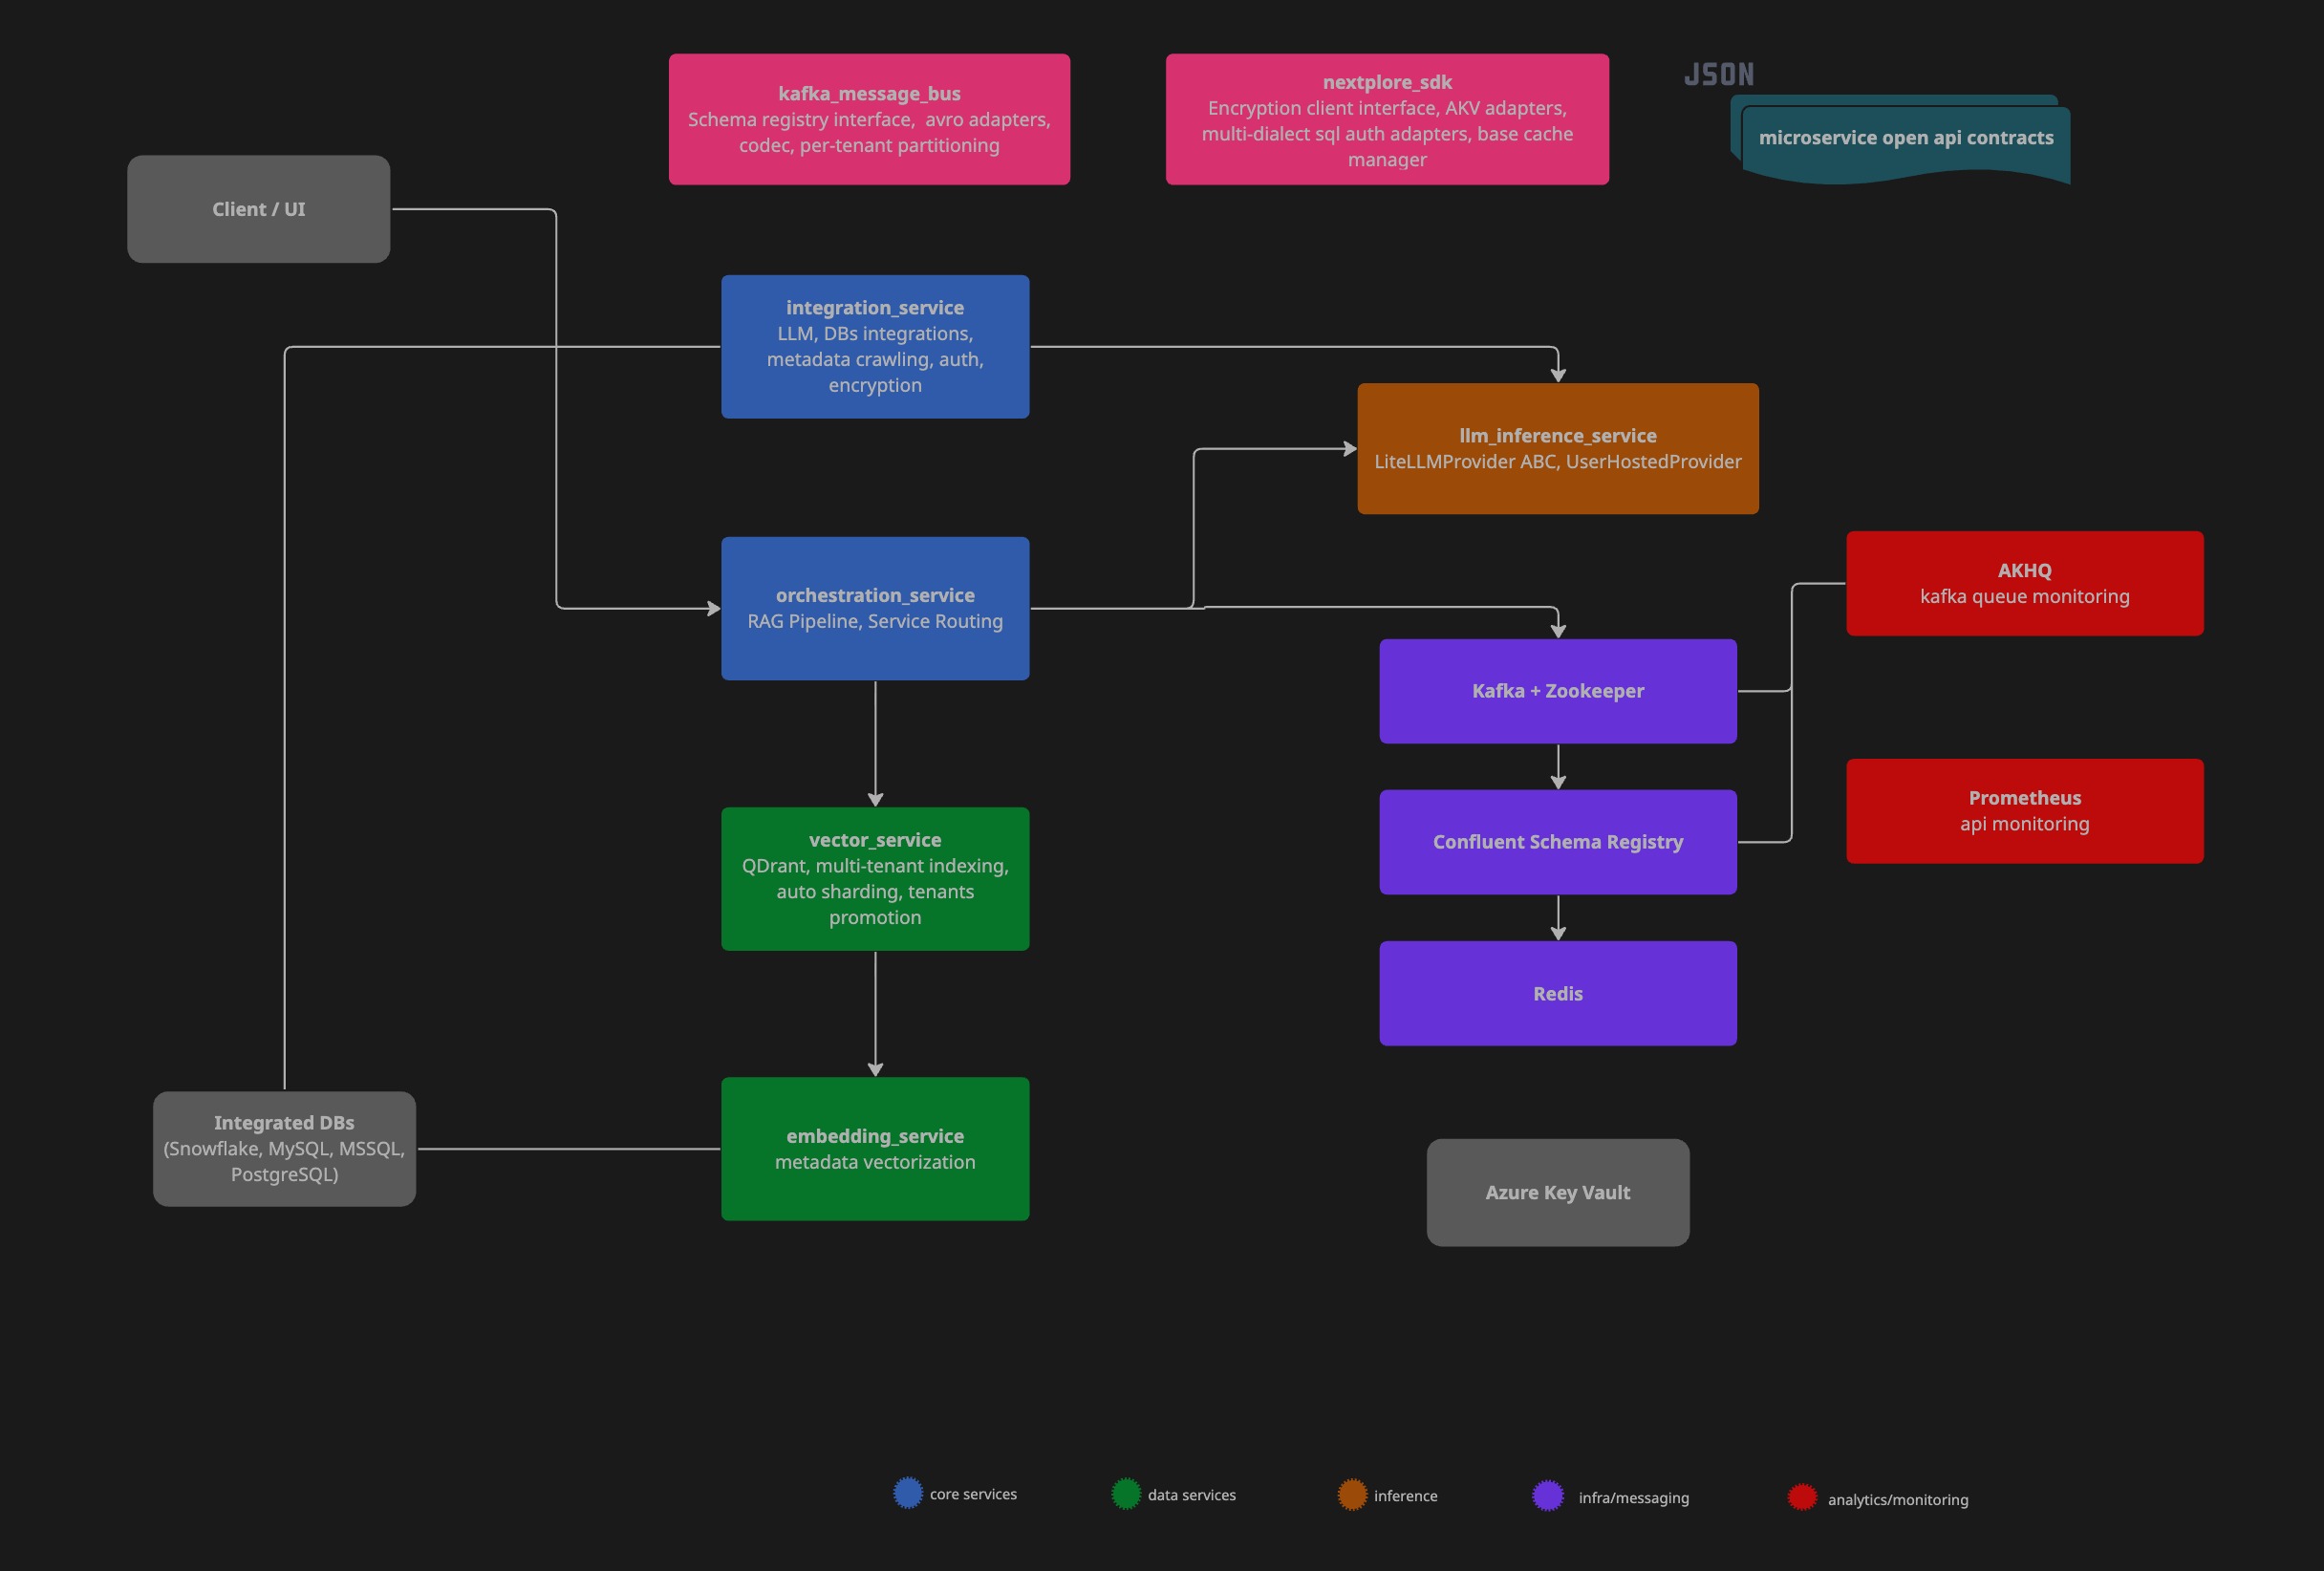
Query Flow
Service breakdown
| Service | Responsibility |
|---|---|
nextplore-orchestrator |
Query entrypoint, pipeline coordination, result assembly |
llm-inference-service |
LLM provider abstraction, ORM structured context generation, multi-query expansion |
vector-service |
Qdrant writes/reads, RRF re-ranking, payload index management |
integration-service |
Datastore CRUD, credential encryption, schema crawling, autosync |
embedding-service |
Text embedding, vector generation for schema metadata |
Inter-service communication
- Synchronous blocking paths: REST/HTTP via custom
httpxasync client - Asynchronous background jobs: Kafka with AVRO schemas versioned in Confluent Schema Registry
- Kafka messages partitioned by
tenant_idfor ordered per-tenant delivery - JWT middleware validates and injects
UserIdentitycontext at every service boundary - Redis hashes access keys with unique user identity data
Tech Stack
| Layer | Technology |
|---|---|
| Backend | Python 3.13, FastAPI, SQLAlchemy 2.x async |
| LLM abstraction | LiteLLM (2,600+ models, 140+ providers) |
| Vector store | Qdrant (multi-tenant, payload-indexed) |
| Relational DB | PostgreSQL with Row-Level Security |
| Cache | Redis (SHA-256 scoped keys per tenant/user) |
| Message queue | Apache Kafka + Confluent Schema Registry (AVRO) |
| Encryption | AES-256-GCM + RSA-OAEP, Azure Key Vault |
| Containerisation | Docker, Docker Compose |
| CI | GitHub Actions |
| Observability | Prometheus metrics, structured JSON logging (Datadog-compatible), AKHQ (Kafka monitoring) |
Database Support
| DB | Native Authentication (cloud-agnostic) | Cloud IAM: Azure |
Cloud IAM: AWS |
Cloud IAM: GCP |
Snowflake: Key-Pair |
Snowflake: Programmatic Access Token (PAT) |
Kerberos/Windows |
|---|---|---|---|---|---|---|---|
| SQL Server | ✅ (MSSQL’s native pwd auth) | ✅ (oAuth 2.0 - Client Secret / Certificate) | ❌ | ❌ | ❌ | ❌ | ❌ |
| MySQL | ✅ (MySQL’s native pwd auth) | ✅ (oAuth 2.0 - Client Secret / Certificate) | ✅ (Assume Role with temp token) | ✅ (IAM DB Auth with Cloud Connector) | ❌ | ❌ | ❌ |
| PostgreSQL | ✅ (PostgreSQL’s native pwd auth) | ✅ (oAuth 2.0 - Client Secret / Certificate) | ✅ (Assume Role with temp token) | ✅ (IAM DB Auth with Cloud Connector) | ❌ | ❌ | ❌ |
| Snowflake | ✅ (Snowflake’s pwd auth) | ❌ | ❌ | ❌ | ✅ (RSA with signed JWT) | ✅ (With network and auth policy) | ❌ |
All connections enforce TLS with full X.509 certificate validation (TrustServerCertificate=false). CA bundles for all AWS and GCP regions are shipped with the service.
LLM Integration
Nextplore routes through LiteLLM, exposing a unified OpenAI-compatible interface regardless of backend provider.
Built-in providers (no configuration required)
- Moonshotai
- meta-Llama
- Qwen
- Deepseek
- OpenAI (GPT-4o)
Custom / self-hosted models
Users can register any OpenAI-compatible endpoint:
{
  "model_id": "meta-llama/Llama-3.1-8B-Instruct",
  "api_base": "https://router.huggingface.co/v1",
  "connection_params": { "api_key": "hf-..." },
  "max_tokens": 4096
}Credentials are encrypted on write (AES-256-GCM, DEK wrapped with tenant KEK in Azure Key Vault) and decrypted at inference time in integration-service.
Security Model
Envelope encryption
Each tenant is provisioned with a dedicated Azure Key Vault. For every registered credential:
- A random DEK (AES-256) is generated
- Credential is encrypted:
AES-256-GCM(plaintext, DEK) - DEK is wrapped:
RSA-OAEP(DEK, KEK)- KEK lives in AKV, never extracted - Stored:
{ ciphertext, nonce, tag, wrapped_dek }- decryptable only with tenant KEK
Tenant isolation
- PostgreSQL RLS enforces per-tenant data visibility at the DB layer
- Redis cache keys are scoped:
SHA-256(tenant_id + user_id + payload_hash) - Kafka messages carry tenant identity in headers; partitioned by
tenant_id - JWT middleware injects
UserIdentity(organization_id, user_id)- validated at every service boundary before any business logic executes
Certificate authentication (Azure)
For Azure IAM integrations, Nextplore generates RSA-3072 key pairs. Private key stored in AKV, public key returned to user for upload to their registered app. JWT signed with private key, validated by Azure against the registered public certificate - no secrets in connection strings.
Observability
Structured logging
All services emit JSON-formatted logs compatible with Datadog log pipelines:
{
  "timestamp": "2026-04-01 20:46:02,183",
  "name": "nextplore_sdk.cache.client.base_redis_client",
  "level": "INFO",
  "message": "Cache MISS orm-context:1cc906a1...",
  "env": "dev",
  "app_name": "llm-inference-service",
  "version": "1.0.0"
}Metrics
Prometheus scrape endpoint exposed per service at /metrics. Tracked: request latency, cache hit/miss ratio, LLM response time, vector search latency.
Demo
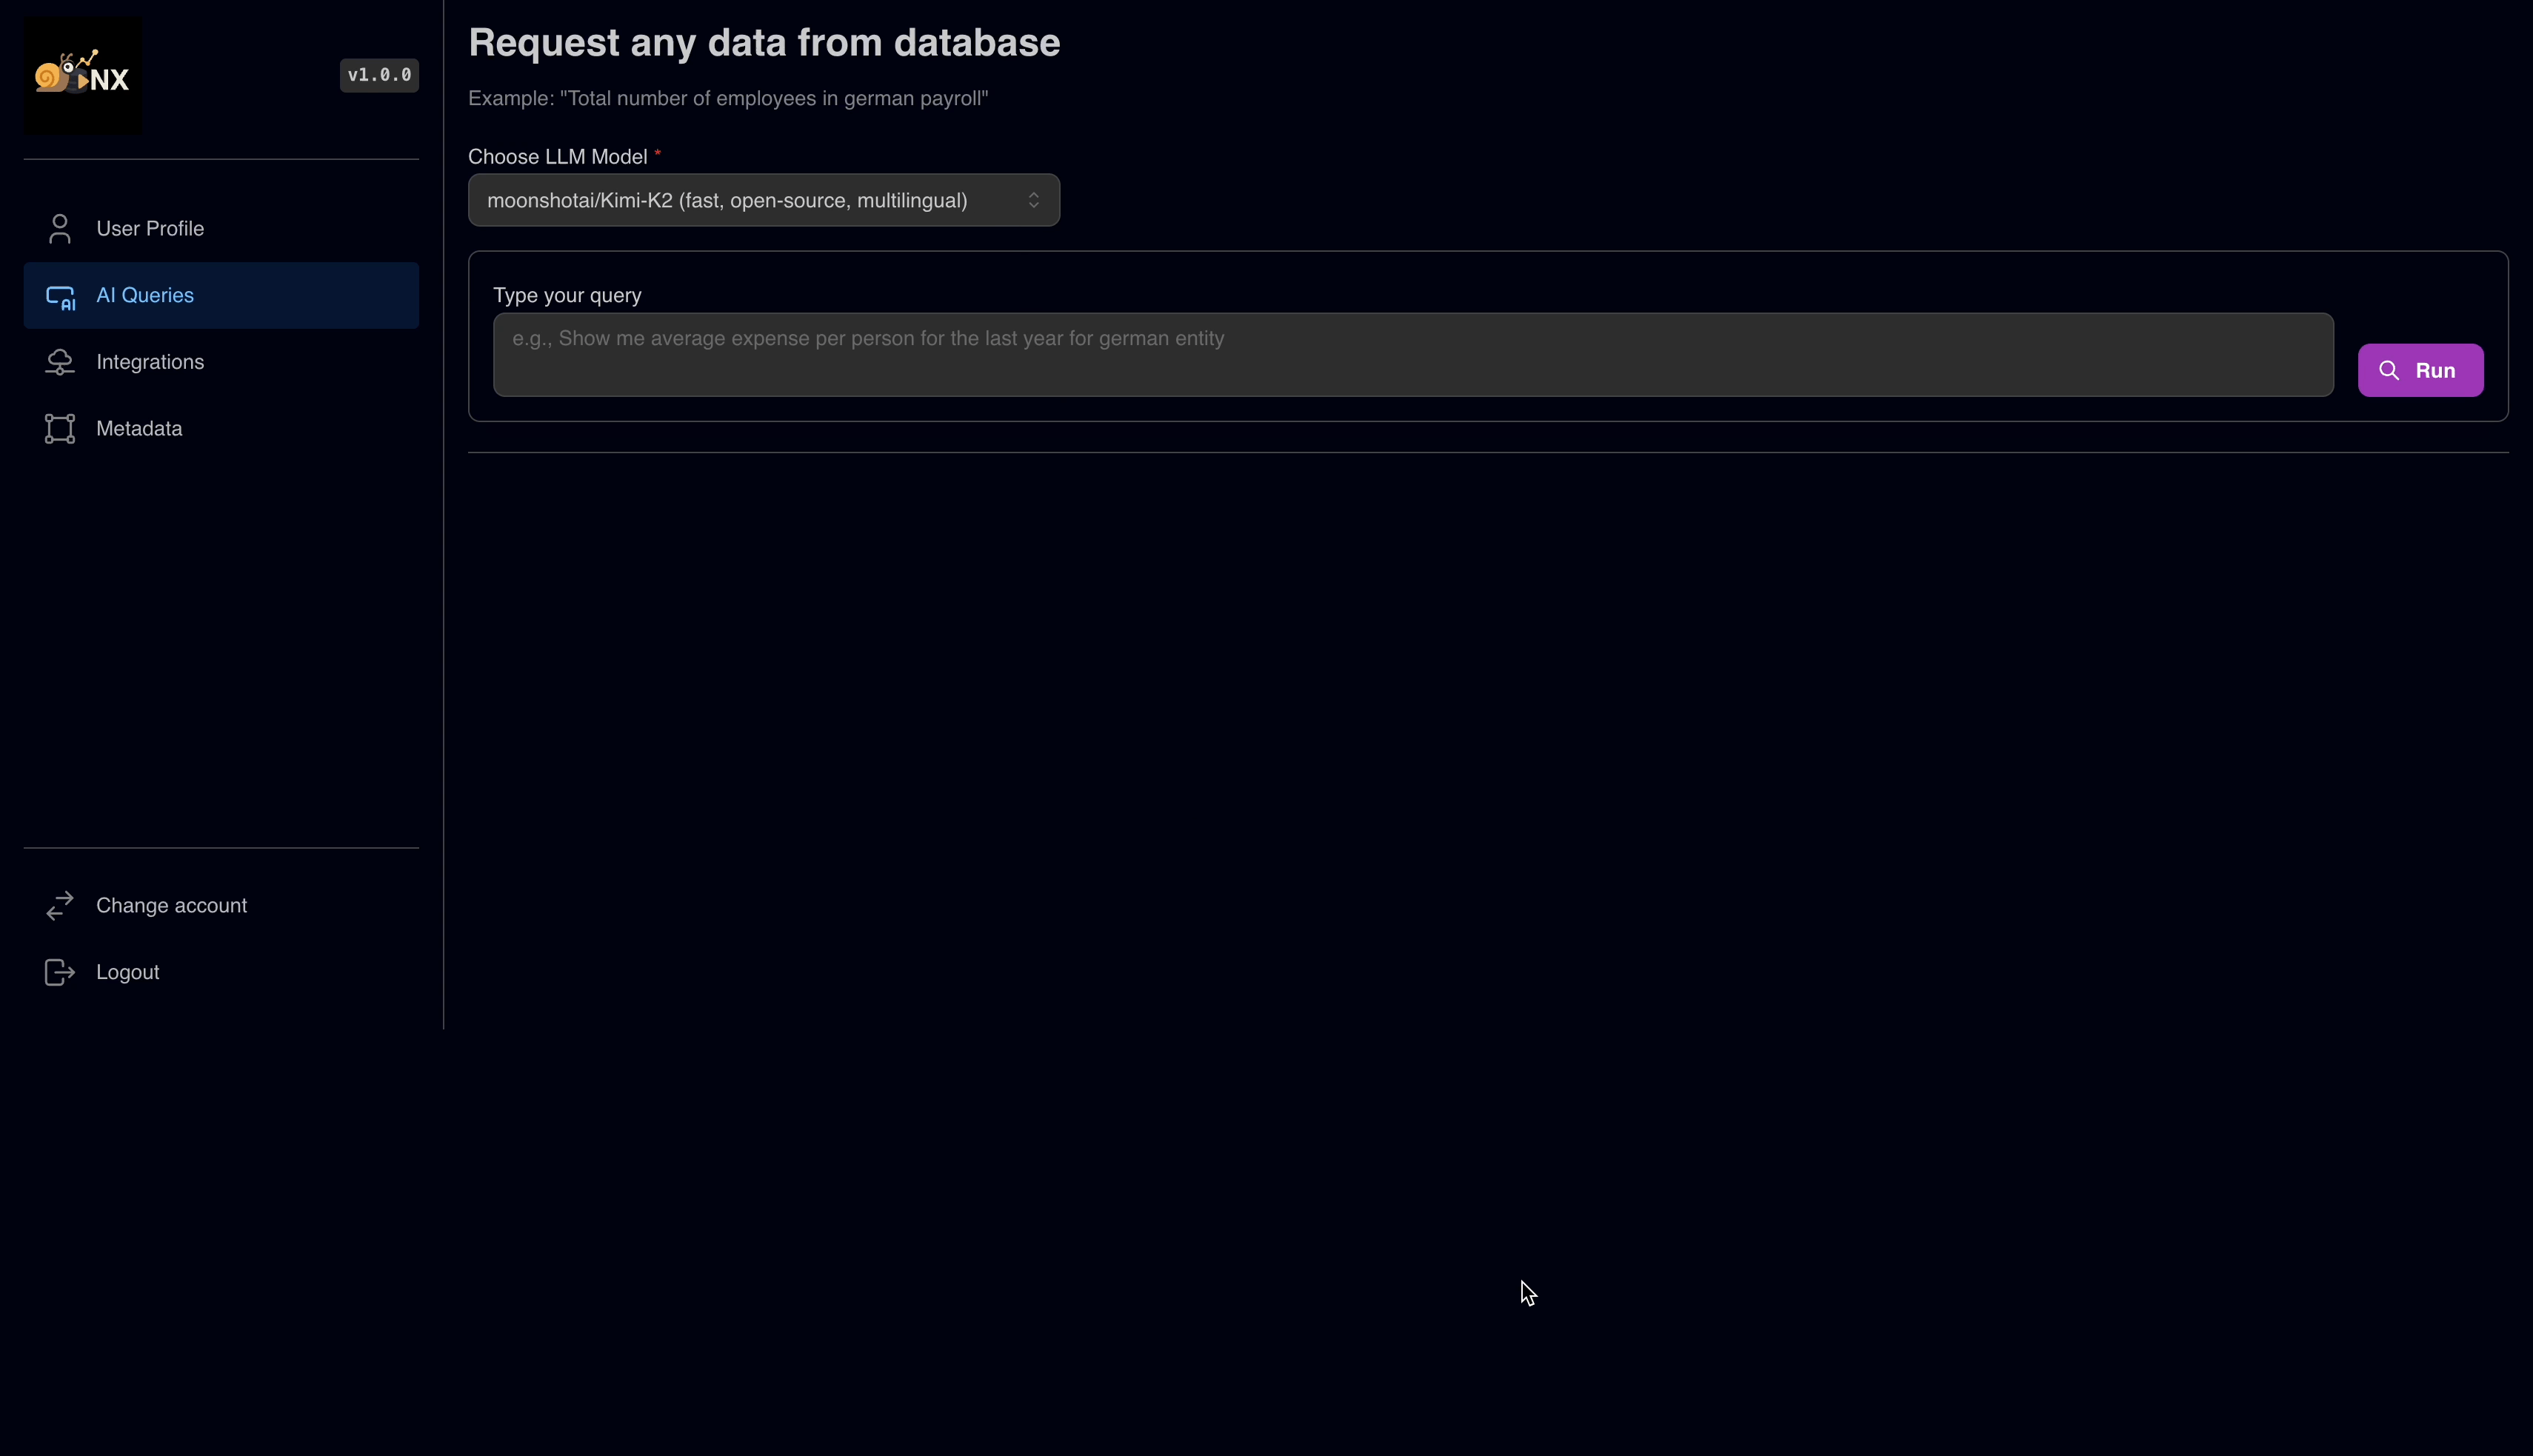
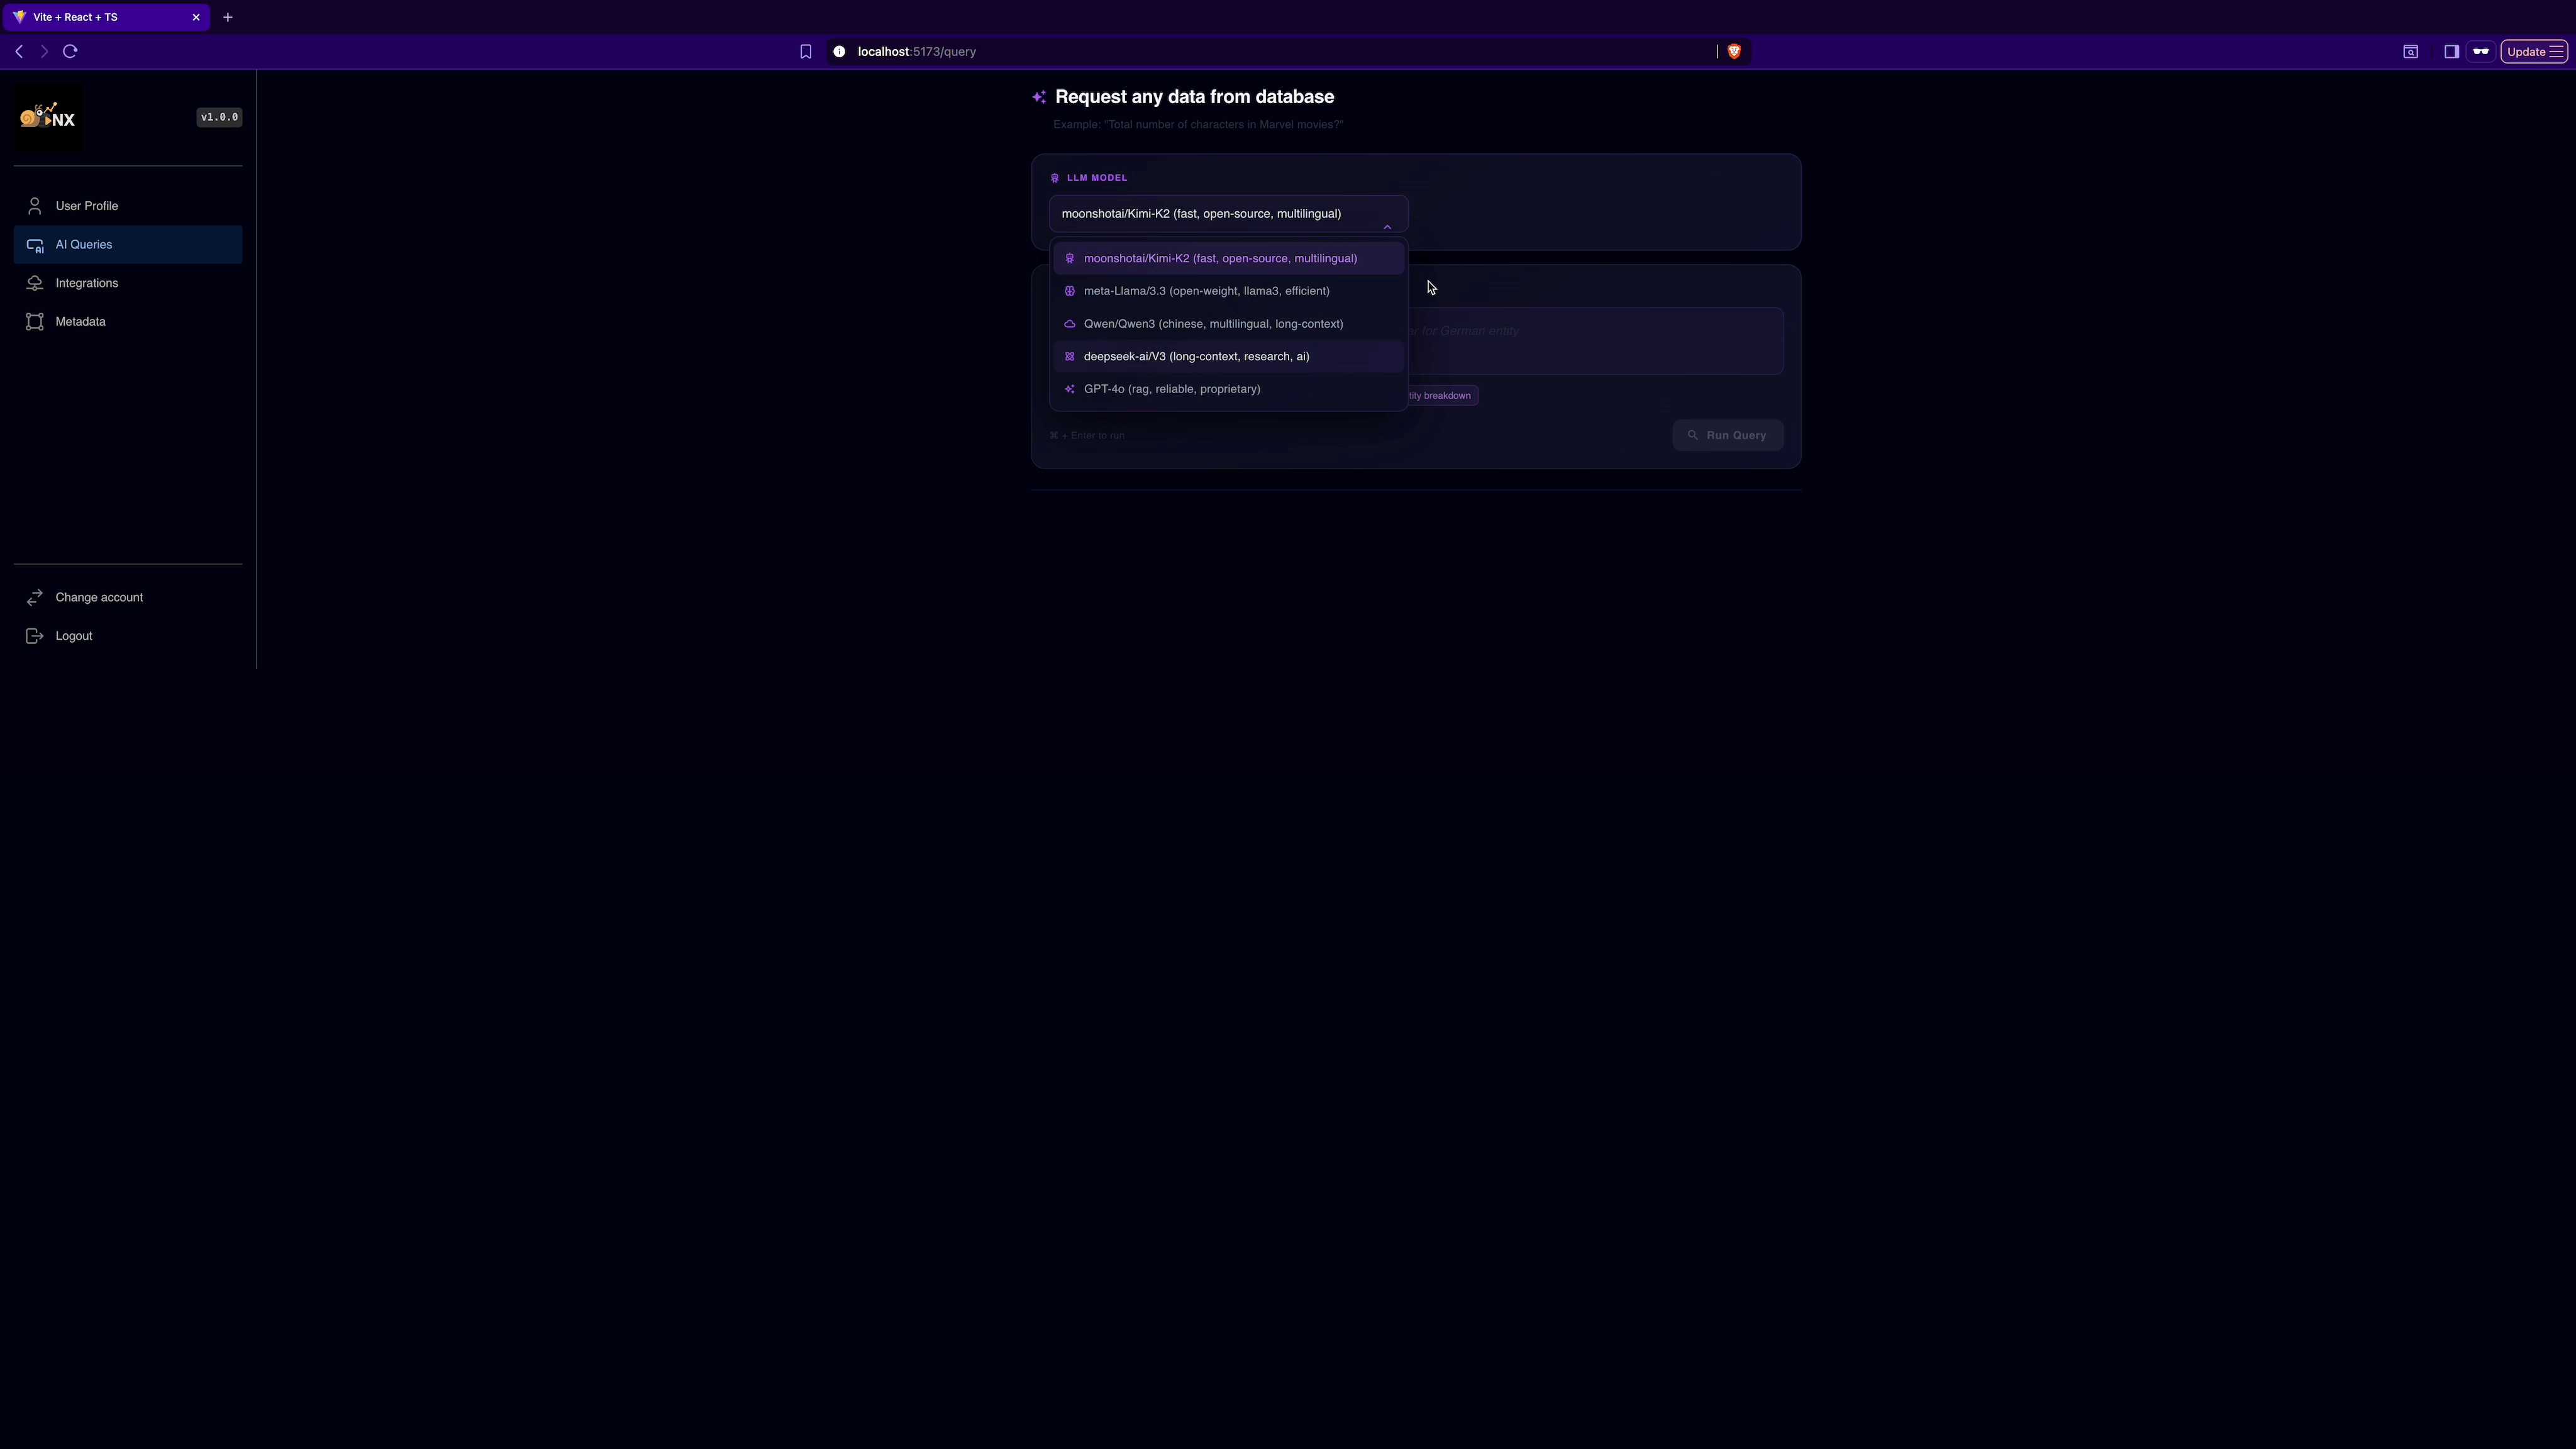
Natural Language Querying
Request any data across your integrations and get structured response.
Pipeline Tracing
Use multi-query retrieval to broaden semantic coverage, combined with Reciprocal Rank Fusion (RRF) for robust result aggregation. Leverage RAG trace instrumentation to gain visibility into context construction and retrieval effectiveness.
SQL Data Stores Integration
Create and manage your SQL data stores. Benefit from LLM help to generate vector-friendly integration description to boost RAG efficiency.
Integration of 2.600+ LLM across 140+ Providers Incl. Self-Hosted Models
Integrated with your own custom models, either self-hosted or private inference endpoints.
Integrating Data Stores
Nextplore natively integrates with multiple database management systems (DBMS), including Snowflake , MySQL , MSSQL , PostgreSQL . For authentication and authorization, it supports standards-based Identity and Access Management (IAM) integration with major cloud providers: Azure, AWS, and GCP - enabling secure, policy-driven access to managed services.
:passport_control: Authentication
All connections are established over TLS withTrustServerCertificate=false, enforcing strict X.509 certificate validation. As a result, the server must present an SSL/TLS certificate issued by a publicly trusted Certificate Authority (CA). Certificates signed by private or internal CAs are not supported.
⚠️ Note 1: To ensure end-to-end trust validation, Nextplore ships and maintains CA bundles across all AWS regions and CA budnles for all GCP regions.
⚠️ Note 2: Currently, Nextplore does not support private endpoints accessible only through customer VNets or VPNs. However, Nextplore guarantees static egress IPs, which allow you to safely expose your database endpoint to the public network while restricting inbound access exclusively to Nextplore’s IP(s). It is recommended to configure your firewall or network security group to permit connections only from this address. :blush: Exception: For GCP-hosted instances Nextplore gives you possibility to avoid IP whitelisting via Cloud Authentication Proxy Connectors as described here .
Metadata overview
Nextplore provides a comprehensive view of the metadata associated with each integration. It enables users to seamlessly inspect and validate active integrations, with a focus on the tables and columns most relevant for Retrieval-Augmented Generation (RAG) query resolution.
By exposing both system-defined and descriptive metadata (e.g., SQL Server extended properties, PostgreSQL COMMENT fields), the platform helps users identify where metadata should be refined or extended.
This refinement enables RAG pipelines to more accurately surface the correct datasets for user queries, ultimately improving both retrieval precision and interpretability of query results.
Connection setup by cloud
SQL server
Nextplore supports multiple authentication methods for SQL Server:
- SQL native authentication with username/password.
- For servers hosted on Azure, you can use Microsoft Entra (Azure AD) Service Principal authentication with oAuth 2.0
- There is no IAM auth available for AWS and GCP for SQL Server.
Native authentication
To enable password authentication for instances hosted on AWS and Azure, you need to provide only host name, username and password. Nextplore automatically takes care of TLS via shared CA bundles.
By default, GCP exposes only a public IP address rather than a hostname, as described in the official documentation .
To ensure TLS and a full CA verification, Nextplore provides 2 main ways to configure password authentication:
-
Native Connection
To enable CA verification, Nextplore configures DNS resolution against the instance. This requires both the public IP address and the corresponding DNS name to be provided, ensuring that certificate validation can be performed automatically.
To retrieve
DNS Namefollow these steps:- Authenticate using gcloud CLI
- Execute the following command (replace placeholders with your instance details):
TEXTgcloud sql instances describe INSTANCE_NAME \ --project=PROJECT_ID- Locate the
dnsNamefield in the output. It will be in the following format:
TEXTINSTANCE_UID.PROJECT_DNS_LABEL.REGION_NAME.sql.goog.In this case your connection stays encrypted and verifiable, but you need to additionally whitelist Nextplore egress IP in your firewall settings.
When creating your integration with simple auth you need to provide the following:
- host (your retrieved
dnsNamefrom GCP) - public IP
- database
- username
- password
-
gcloud Proxy Connection
Nextplore also provides implementation of engine creator via GCP Cloud SQL Connector which overtakes encryption and removes the burden of managing firewall rules or SSL certificates manually. It means as long as your instance is hosted on Azure, you do not have to include Nextplore egress IP in your firewall whitelist. To do so, Nextplore runs GCP service account to which you need to give respective access rights. (similar to AWS role permissions)
To enable Connector Login, follow these steps:
- On GCP go to IAM -> Grant Access
- Add Nextplore GCP service account and provide it with
Cloud SQL Clientrole. (service account name will be shown on creation)
When creating your integration with GCP Cloud Connector you need to provide the following:
- host (your connection name from GCP instance)
- database
- username (for SQL login)
- password (for SQL login)
IAM
Microsoft provides a very comprehensive guide on how to connect with oAuth 2.0 on Azure SQL Server.
⚠️ Note: With minor syntatic sugar differences the configuration of oAuth 2.0 on Azure is very similar for SQL Server, MySQL and PostgreSQL. For non-native DBMS logging in as initial admin is enabled via token auth.
- Under your running Azure Server Instance, set Microsoft Entra Admin (it will be used for initial connection and creating AAD users in SQL Server)
- Connect to your instance from VSCode or ADS with Microsoft Entra Id - Universal with MFA Support authentication type using your Microsoft Entra Admin account.
- ADS:
- left-bottom account corner
- add linked accounts
- log in via browser with MFA
- VSCode
- install mssql extension
- go to SQL server
- add connection
- insert instance name of your SQL Server (your-instance.database.windows.net)
- provide database name (optional)
- choose authentication type Microsoft Entra Id - Universal with MFA Support
- log in via browser with MFA
- ADS:
- Register Application in Azure.
- Ensure your service principal has
Directory Readersrole in Azure.
- Ensure your service principal has
- Create Microsoft Entra Principals in SQL.
- Ensure microsoft entra principal name in SQL matches exactly the one you just registered.
CREATE USER [<Microsoft_Entra_principal_name>] FROM EXTERNAL PROVIDER;- You may want to restrict rights of the user to SELECT-ONLY and to certain schemas/tables that you want to query with Nextplore in the future.
- Then you have 2 options:
- Client Secret Auth:
- Add secrets to your registered app
- When creating integration on Nextplore just provide your client secret, tenant id, client id.
- Nextplore will store them encrypted and will take care of [oAuth 2.0]
- Note, that your client secrets will NOT be used in connection string and authentication will happen using temp byte token as described here
- Certificate Auth:
- Although Nextplore supports using secrets for oAuth 2.0, the use of those is discouraged due to exposure of secrets (for flexible servers) in connection strings and short-life nature of secrets.
- It is highly advised to use Certificate authentication instead. Certificates are long-lived and provide much better way to authenticate.
- If you choose authentication with Azure IAM via Certificate, Nextplore will generate certficate key pairs (RSA 3072) and store private key securely in AKV and provide you with public one.
- Then you will just need to upload this public key to your registered app, so that it can verify JWT which Nextplore signed with private key.
- Client Secret Auth:
MySQL
Nextplore also supports different authentication methods for MySQL:
- SQL Native authentication with username/password (e.g.
caching_sha2_passwordormysql_native_password). - For Azure Database for MySQL, you can also enable OAuth 2.0 authentication.
- For Aurora and RDS on AWS, you can also enable IAM connection with temporary tokens via Role Assumption Policy .
- For GCP, you have the possibility to connect with IAM authentication with temporary tokens via Cloud Connector .
Native authentication
To enable password authentication for instances hosted on AWS and Azure, you need to provide only host name, username and password. Nextplore automatically takes care of TLS via shared CA bundles.
By default, GCP exposes only a public IP address rather than a hostname, as described in the official documentation .
To ensure TLS and a full CA verification, Nextplore provides 2 main ways to configure password authentication:
-
Native Connection
To enable CA verification, Nextplore configures DNS resolution against the instance. This requires both the public IP address and the corresponding DNS name to be provided, ensuring that certificate validation can be performed automatically.
To retrieve
DNS Namefollow these steps:- Authenticate using gcloud CLI
- Execute the following command (replace placeholders with your instance details):
TEXTgcloud sql instances describe INSTANCE_NAME \ --project=PROJECT_ID- Locate the
dnsNamefield in the output. It will be in the following format:
TEXTINSTANCE_UID.PROJECT_DNS_LABEL.REGION_NAME.sql.goog.In this case your connection stays encrypted and verifiable, but you need to additionally whitelist Nextplore egress IP in your firewall settings.
When creating your integration with simple auth you need to provide the following:
- host (your retrieved
dnsNamefrom GCP) - public IP
- database
- username
- password
-
gcloud Proxy Connection
Nextplore also provides implementation of engine creator via GCP Cloud SQL Connector which overtakes encryption and removes the burden of managing firewall rules or SSL certificates manually. It means as long as your instance is hosted on Azure, you do not have to include Nextplore egress IP in your firewall whitelist. To do so, Nextplore runs GCP service account to which you need to give respective access rights. (similar to AWS role permissions)
To enable Connector Login, follow the following steps:
- On GCP go to IAM -> Grant Access
- Add Nextplore GCP service account and provide it with
Cloud SQL Clientrole. (service account name will be shown on creation)
When creating your integration with GCP Cloud Connector you need to provide the following:
- host (your connection name from GCP instance)
- database
- username (for SQL login)
- password (for SQL login)
IAM Azure
To enable oAuth 2.0 authentication for MySQL on Azure, follow these steps:
- Create (if not done already) MySQL instance on Azure for MySQL flexible servers.
- Create user managed identity ( UMI ).
- Assign following privelleges to UMI:
- User.Read.All
- GroupMember.Read.All
- Application.Read.ALL
- Set Microsoft Entra Admin (same as by SQL Server)
- Enable either Microsoft Entra authentication only or MySQL and Microsoft Entra authentication under Authentication in your MySQL instance on Azure.
- Once enabled, Microsoft Entra admin may log in and create AAD users for connections. (in our case AAD user will be service principal)
- Register application if not done -> this will be used as AAD user for connection.
- Unlike SQL Server where connection was performed interactively through ADS or VSCODE, for initial login as admin you need to provide a valid access token as password yourself.
- To do so get token in Azure CLI like this:
- log in to azure via browser and choose/confirm your subscription:
az login - once confirmed and logged in fetch the token into TOKEN variable:
TOKEN=$(az account get-access-token --resource-type oss-rdbms -o tsv --query accessToken) - now you may go to MySQL Workbench and insert obtained token as password and your your Entra Admin as user name (for other ways to initially connect, check the guide ).
- log in to azure via browser and choose/confirm your subscription:
- When you are inside MySQL, create the AAD user with this statement:
CREATE AADUSER '<service_principal_name>';- You may want to restrict rights of the user to SELECT-ONLY and to certain schemas/tables that you want to query with Nextplore in the future.
- Again, oAuth 2.0 access to the service principal may be configured via secret or certificate with the latter being preferred method.
Here is also a microsoft guide on the same.
IAM AWS
To enable IAM authentication on AWS, follow these steps:
- Create (if not done already) MySQL instance on AWS.
- Connect to MySQL (e.g. via MySQL Workbench) with your admin account (you should have created this when making the instance)
- Create user for future connection: Here, again you may want to restrict what Nextplore service may access in your DB.
- In MySQL IAM access is provided by AWSAuthenticationPlugin
-- create user identified with AWSAuthenticationPlugin which will handle IAM token auth
CREATE USER 'test_user'@'%' IDENTIFIED WITH AWSAuthenticationPlugin AS 'RDS';

-- GRANT least privelege access to DB or retrict further to schemas
GRANT SELECT ON your_database.* TO 'test_user'@'%';- Create IAM policy for
test_user:
Example: IAM Policy
{
  "Version": "2012-10-17",
  "Statement": [
    {
      "Effect": "Allow",
      "Action": "rds-db:connect",
      "Resource": "arn:aws:rds-db:<REGION>:<ACCOUNT_ID>:dbuser:<RESOURCE-ID>/test_user"
    }
  ]
}REGION: region of your DB.
ACCOUNT_ID: your account ID.
RESOURCE-ID: resource id of your DB instance.
- Since Nextplore uses Role Assumption for AWS IAM, you need to create role to set up the permission policy for AWS Nextplore account with your DB user.
⚠️ Note::
- Nextplore uses AWS Service -
ec2.amazonaws.com- underNextploreExecutionRolefor accessing your DB instance. So in your permission policy, you should name principal accordingly (see example below).- Nextplore also validates the role names it is allowed to assume. So please ensure arn follows this naming convention:
arn:aws:iam::<YOUR_ACCOUNT_ID>:role/NextploreRdsAccessRole.
Example: Trust Policy
{
  "Version": "2012-10-17",
  "Statement": [
    {
      "Effect": "Allow",
      "Principal": {
        "AWS": "arn:aws:iam::<NEXTPLORE_SAAS_AWS_ACCOUNT_ID>:role/NextploreExecutionRole"
      },
      "Action": "sts:AssumeRole",
      "Condition": {
        "StringEquals": {
          "sts:ExternalId": "<EXTERNAL_ID>"
        }
      }
    }
  ]
}NEXTPLORE_SAAS_AWS_ACCOUNT_ID: Nextplore AWS Account
- we will provide you with this when you create your integration
EXTERNAL_ID: Unique connection id for Nextplore (declared in trust policy you created).
- Attach IAM policy as permission from
test_user(created in Step 4) to the role you just created.
IAM GPC
To enable IAM authentication on GCP, follow these steps:
- Create (if not done already) managed MySQL instance on GCP.
- During creation make sure to set
Public IPin the IP instance assignment andcloudsql_iam_authentication(on)flag. - Go to IAM -> Grant Access and add provided Nextplore GCP Service Account and assign both
Cloud SQL ClientandCloud SQL Instanceroles. - After instance is provisioned, make sure to set
Allow only SSL connectionsunder Connections -> Security. - Go to Users -> Add User Account -> Cloud IAM and enter Nextplore GCP Service Account.
- Connect to your instance with admin you set when creating the instance.
- Assign the least privilege access to the Nextplore GCP Service Account user.
⚠️ Note:: GCP shortens the service account name when creating user to ensure it does not exceed user name length limits. So service account
nextplore-service@nextplore-123.iam.gserviceaccount.combecomes justnextplore-service@nextplore-123.iam. This is the account you need to provide SQL access to.
Example MySQL Login Access Provision:
-- GRANT least privilege access to DB or restrict further to schemas
GRANT SELECT ON your_database.* TO 'nextplore-service@nextplore-123.iam';PostgreSQL
Nextplore provides multiple authentication methods for PostgreSQL:
- Native authentication with username/password.
- For Azure Database for PostgreSQL, you can also enable OAuth 2.0 authentication.
- For Aurora and RDS on AWS, you can also enable IAM connection with temporary tokens via Role Assumption .
Native authentication
To enable password authentication for instances hosted on AWS and Azure, you need to provide only host name, username and password. Nextplore automatically takes care of TLS via shared CA bundles.
By default, GCP exposes only a public IP address rather than a hostname, as described in the official documentation .
To ensure TLS and a full CA verification, Nextplore provides 2 main ways to configure password authentication:
-
Native Connection
To enable CA verification, Nextplore configures DNS resolution against the instance. This requires both the public IP address and the corresponding DNS name to be provided, ensuring that certificate validation can be performed automatically.
To retrieve
DNS Namefollow these steps:- Authenticate using gcloud CLI
- Execute the following command (replace placeholders with your instance details):
TEXTgcloud sql instances describe INSTANCE_NAME \ --project=PROJECT_ID- Locate the
dnsNamefield in the output. It will be in the following format:
TEXTINSTANCE_UID.PROJECT_DNS_LABEL.REGION_NAME.sql.goog.In this case your connection stays encrypted and verifiable, but you need to additionally whitelist Nextplore egress IP in your firewall settings.
When creating your integration with simple auth you need to provide the following:
- host (your retrieved
dnsNamefrom GCP) - public IP
- database
- username
- password
-
gcloud Proxy Connection
Nextplore also provides implementation of engine creator via GCP Cloud SQL Connector which overtakes encryption and removes the burden of managing firewall rules or SSL certificates manually. It means as long as your instance is hosted on Azure, you do not have to include Nextplore egress IP in your firewall whitelist. To do so, Nextplore runs GCP service account to which you need to give respective access rights. (similar to AWS role permissions)
To enable Connector Login, follow the following steps:
- On GCP go to IAM -> Grant Access
- Add Nextplore GCP service account and provide it with
Cloud SQL Clientrole. (service account name will be shown on creation)
When creating your integration with GCP Cloud Connector you need to provide the following:
- host (your connection name from GCP instance)
- database
- username (for SQL login)
- password (for SQL login)
IAM Azure
To use oAuth 2.0 flow with Microsoft Entra, please follow these steps:
- Create (if not already done) PostgreSQL instance on Azure for flexible servers.
- Set Microsoft Entra Admin(s) for initial authentication and AD users creation (unlike MySQL, multiple admins are possible here).
- Register you application with
your-sp-name. - Obtain the login admin token the same way as described in MySQL step 9 above.
- Use this token in pgAdmin to connect.
- For your registered application run the following statement:
SELECT * FROM pg_catalog.pgaadauth_create_principal_with_oid(
    'your-sp-name',
    'your-sp-object-id',
    'service', -- type 'user', 'group' or 'service'
    false, -- not external - since sp is native principal to your tenant
    false -- not federated - since bult in and no federated IDP
)- Again here, enable app authentication either with secret or certificate (preferred).
For more info you can refer to this guide .
IAM AWS
To connect via IAM in AWS, follow these steps:
- Create PostgreSQL instance on AWS under if not done.
- Connect to PostgreSQL (e.g. via pgAdmin or psql) with your admin account (you should have created this when making the instance)
- Create user for future connection: Here, again you may want to restrict what Nextplore service may access in your DB.
- In PostgreSQL you need to grant rds_iam role to the user for IAM authentication.
CREATE USER test_user WITH LOGIN;

GRANT rds_iam TO test_user;

GRANT CONNECT ON DATABASE starwars_universe TO test_user;
GRANT USAGE ON SCHEMA death_star TO test_user;
GRANT SELECT ON ALL TABLES IN SCHEMA death_star TO test_user;
ALTER DEFAULT PRIVILEGES IN SCHEMA death_star GRANT SELECT ON TABLES TO test_user;- Create IAM policy for
test_user:
Example: IAM Policy
{
  "Version": "2012-10-17",
  "Statement": [
    {
      "Effect": "Allow",
      "Action": "rds-db:connect",
      "Resource": "arn:aws:rds-db:<REGION>:<ACCOUNT_ID>:dbuser:<RESOURCE-ID>/test_user"
    }
  ]
}REGION: region of your DB.
ACCOUNT_ID: your account ID.
RESOURCE-ID: resource id of your DB instance.
- Since Nextplore uses Role Assumption you need to create role to set up the trust relationship with AWS Nextplore account.
⚠️ Note::
- Nextplore uses AWS Service -
ec2.amazonaws.com- underNextploreExecutionRolefor accessing your DB instance. So in your permission policy, you should name principal accordingly (see example below).- Nextplore also validates the role names it is allowed to assume. So please ensure arn follows this naming convention:
arn:aws:iam::<YOUR_ACCOUNT_ID>:role/NextploreRdsAccessRole.
Example: Trust Policy
{
  "Version": "2012-10-17",
  "Statement": [
    {
      "Effect": "Allow",
      "Principal": {
        "AWS": "arn:aws:iam::<NEXTPLORE_SAAS_AWS_ACCOUNT_ID>:role/NextploreExecutionRole"
      },
      "Action": "sts:AssumeRole",
      "Condition": {
        "StringEquals": {
          "sts:ExternalId": "<EXTERNAL_ID>"
        }
      }
    }
  ]
}NEXTPLORE_SAAS_AWS_ACCOUNT_ID: Nextplore AWS Account
- we will provide you with this when you create your integration
EXTERNAL_ID: Unique connection id for Nextplore
- we will provide you with this when you create your integration
- Attach IAM policy as permission from
test_user(created in Step 4) to the role you just created.
IAM GPC
To enable IAM authentication on GCP, follow these steps:
- Create (if not done already) managed PostgreSQL instance on GCP.
- During creation make sure to set
Public IPin the IP instance assignment andcloudsql_iam_authentication(on)flag. - Go to IAM -> Grant Access and add provided Nextplore GCP Service Account and assign both
Cloud SQL ClientandCloud SQL Instanceroles. - After instance is provisioned, make sure to set
Allow only SSL connectionsunder Connections -> Security. - Go to Users -> Add User Account -> Cloud IAM and enter Nextplore GCP Service Account.
- Connect to your instance with admin you set when creating the instance.
- Assign the least privelege access to the Nextplore GCP Service Account user in the database.
⚠️ Note:: GCP shortens the service account name when creating user to ensure it does not exceed user name length limits. So service account
nextplore-service@nextplore-123.iam.gserviceaccount.combecomes justnextplore-service@nextplore-123.iam. This is the account you need to provide SQL access to.
Example PostgreSQL Login Access Provision:
GRANT CONNECT ON DATABASE hogwarts to "nextplore-service@nextplore-123.iam"
GRANT USAGE ON SCHEMA public to "nextplore-service@nextplore-123.iam"
GRANT SELECT ON ALL TABLES IN SCHEMA public to "nextplore-service@nextplore-123.iam"
ALTER DEFAULT PRIVILEGES IN SCHEMA public
GRANT SELECT ON TABLES TO "nextplore-service@nextplore-123.iam"Snowflake
Nextplore provides multiple authentication methods for Snowflake:
- Native authentication with username/password.
- Key-pair (RSA) Auth with public/private keys.
- Programmatic Access Token (PAT) with temporary tokens.
Native authentication
To enable native authentication you can easily create role (with least desired priveleges and provide username and user password in your integrations credentials). Nextplore highly recommends you to enable additional network policy for the user and whitelist Nextplore public IP only.
Here is a code sample which you can quickly run in your Snowsight .
CREATE ROLE NEXTPLORE_SERVICE;

GRANT USAGE ON WAREHOUSE <YOUR-WAREHOUSE> TO ROLE NEXTPLORE_SERVICE;
GRANT USAGE ON DATABASE <YOUR-DATABASE> TO ROLE NEXTPLORE_SERVICE;
GRANT USAGE ON SCHEMA <YOUR-SCHEMA> TO ROLE NEXTPLORE_SERVICE;

GRANT SELECT ON ALL TABLES IN SCHEMA <YOUR-SCHEMA> TO ROLE NEXTPLORE_SERVICE;
GRANT SELECT ON FUTURE TABLES IN SCHEMA <YOUR-SCHEMA> TO ROLE NEXTPLORE_SERVICE; -- if you want Nextplore to synchronise changes for future tables as well

CREATE USER NEXTPLORE_USER PASSWORD='NotEasyToGuess!' MUST_CHANGE_PASSWORD=FALSE
DEFAULT_ROLE = NEXTPLORE_SERVICE
DEFAULT_WAREHOUSE=<YOUR-WAREHOUSE>
DEFAULT_NAMESPACE=<YOUR-DATABASE>.<YOUR-SCHEMA>

-- create and set network policy for the user
CREATE OR REPLACE NETWORK POLICY nextplore_only
ALLOWED_IP_LIST = (<nextplore-public-ip>)

ALTER USER NEXTPLORE_PWD SET NETWORK_POLICY = NEXTPLORE_USER;Key-pair (RSA)
Nextplore supports key-pair authentication for secure user access to Snowflake. When this method is enabled, Nextplore generates a RSA key-pair and provides the corresponding public key (.pub), which must be registered with the designated Snowflake user account. The private key is securely stored in Azure Key Vault (AKV), where it remains encrypted at rest.
During authentication, Nextplore leverages the private key to sign JWT, which is subsequently validated against the public key associated with the Snowflake user. This ensures a secure, asymmetric cryptographic validation process, aligning with Snowflake’s recommended best practices.
Provided that you have created user and role with least privelege access, the following code snippet can be executed directly in Snowsight to configure the user with provided public key.
GRANT MODIFY PROGRAMMATIC AUTHENTICATION METHODS ON USER <NEXTPLORE-USER>
  TO ROLE <NEXTPLORE-ROLE>;

ALTER USER NEXTPLORE_PWD SET RSA_PUBLIC_KEY='<.pub key provided by Nextplore>';Programmatic access token (PAT)
Nextplore provides you with possibility to use also PAT for authentication in Snowflake. Nextplore discourages this though, since tokens are short-lived and need to be rotated. Use those when you want a quick test for a particular small set of data.
To use PAT, you need to fullfil network access policy (overridable but not recommended) and authentication policy requirements as described in official documenation .
Here is a code sample how you can configure PAT on snowflake:
-- create and set network policy for the user
CREATE OR REPLACE NETWORK POLICY nextplore_only
ALLOWED_IP_LIST = (<nextplore-public-ip>)

ALTER USER NEXTPLORE_PWD SET NETWORK_POLICY = NEXTPLORE_USER;

CREATE AUTHENTICATION POLICY nextplore_auth
    PAT_POLICY=(
        NETWORK_POLICY_EVALUATION = ENFORCED_REQUIRED
        DEFAULT_EXPIRY_IN_DAYS = 15, -- expiration default for PAT
        MAX_EXPIRY_IN_DAYS = 90); -- cap max allowed lifetime for PAT


ALTER USER NEXTPLORE_PWD
ADD PROGRAMMATIC ACCESS TOKEN NEXTPLORE_PAT
DAYS_TO_EXPIRY = 30; -- copy paste token and insert as password in your data_store⚠️ Note: To enable more robust integration experience, it is planned to add gateway agent for Kerberos in the next releases.
Links
Roadmap
Future releases will focus on improving RAG optimisation, LLM output quality and vector store configuration to improve model results at scale.